The steel cable running between your two anchor trees is the single structural backbone of every zipline — it carries the full weight of the rider, the trolley (the wheel-and-frame assembly that rolls along the cable), and every dynamic force that builds as the rider accelerates. Get it right and you have decades of trouble-free rides. Spec it too light and you’re gambling with a failure mode that offers almost no warning. If you’ve outgrown a starter kit and you’re now sourcing raw cable to build or upgrade a custom span, this guide walks you through the three variables that matter most — diameter, strand count, and breaking strength — and gives you a clear decision framework so you leave this page knowing exactly what to order.
| EDITOR'S PICK[VEVOR 3/16 Stainless Steel Wire…](https://www.amazon.com/dp/B07LF63YWD?tag=greenflower20-20) | Mid-tier1/4" Stainless Steel Cable | Budget pick[Mophorn Stainless Steel Cable R…](https://www.amazon.com/dp/B075D3BQN6?tag=greenflower20-20) | |
|---|---|---|---|
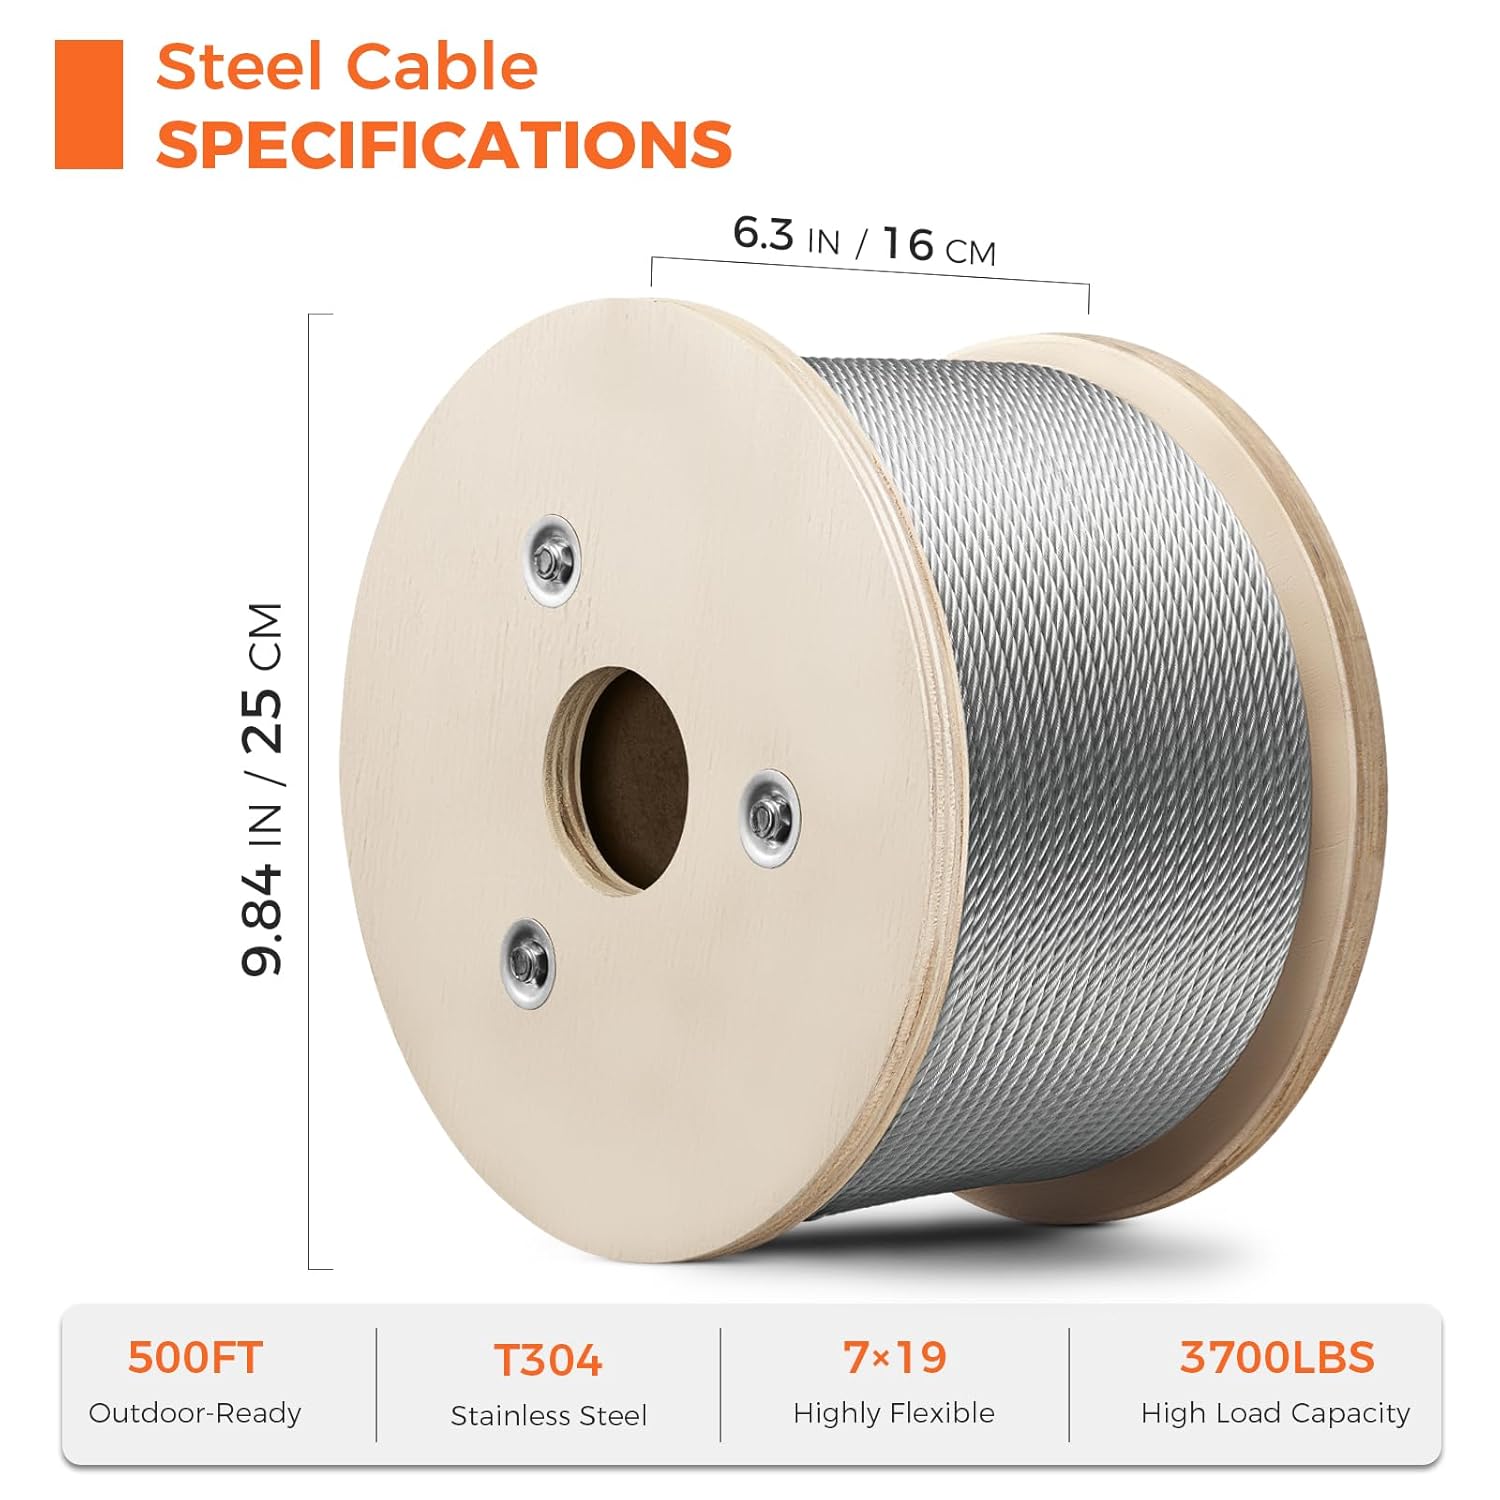
| Diameter | 3/16" | 1/4" | 1/8" |
| Length | 500 ft | 150 ft | 500 ft |
| Strand Count | 1x19 | 7x19 | 7x7 |
| Breaking Strength | 4200 lbs | 6400 lbs | — |
| Material | T316 Stainless | Stainless Steel | 316 Marine Grade |
| Price | $121.49 | $99.99 | $62.90 |
| See on Amazon → | See on Amazon → | See on Amazon → |
Why Cable Spec Is the Decision That Anchors Everything Else
Every other component on your zipline — trolley, brake, carabiner, harness — has a published working load limit (WLL), the maximum force a manufacturer certifies the part to handle in normal use. But cable is the one element where DIY builders most often under-specify, because the marketing on starter-kit packaging blurs the line between “adequate for one 80-pound child on a 100-foot span” and “adequate for your actual build.”
Here’s the mental model to hold onto: cable specs don’t exist in isolation. Breaking strength (the force, measured in pounds or kilonewtons, at which a cable will catastrophically fail under a single static pull) is only meaningful relative to your safety factor — the ratio between breaking strength and the maximum load you’ll actually put on the cable. The ACCT Standards for Challenge Course and Zipline Design specifies a minimum safety factor of 10:1 for participant-bearing ziplines. That means if your heaviest rider plus dynamic loading works out to 400 lbs of tension, you need cable with a breaking strength of at least 4,000 lbs. In practice, most intermediate DIY builders are working with spans that generate peak cable tensions well above rider body weight once you account for sag geometry, and the 10:1 rule is not conservative overkill — it’s the floor.
ASTM F2959, the standard practice for aerial adventure courses, reinforces this framework and adds language about inspection intervals and termination hardware, which affects which cable constructions are acceptable on a real installation.
Diameter and Strand Count: What the Numbers Actually Mean
Walk into any wire rope supplier’s catalog and you’ll see listings like 3/8” 7×19 galvanized or 1/4” 7×7 stainless. Breaking this down:
- Diameter (the first number) is the outside measurement of the cable in inches. Common zipline diameters run from 3/16” on the lightest residential kits up to 1/2” on commercial-grade installations.
- Strand count (the two numbers after the diameter, like 7×19) describes the cable’s internal construction. A 7×19 cable has 7 strands twisted together, each strand made of 19 individual wires — 133 wires total. A 7×7 has 7 strands of 7 wires each — 49 wires total.
Why does that matter? More wires per strand means more flexibility — the cable bends more easily, handles repeated cycling through pulleys, and is more forgiving when you’re tensioning it with a come-along or cable puller. Fewer, thicker wires per strand means stiffer, more abrasion-resistant cable that holds its shape under sustained load and resists kinking. For a fixed-span zipline with static tensioned cable, 7×7 construction is the workhorse standard. For applications where the cable routes over a sheave (a grooved wheel) or gets flexed repeatedly at connection points, 7×19 is worth the slight price premium.
By the Numbers: Common DIY Zipline Cable Specs
| Diameter | Construction | Approx. Breaking Strength (galvanized) | Typical Use Case |
|---|---|---|---|
| 3/16” | 7×7 | ~4,000 lbs | Light kids’ spans, under 150 ft, max 150 lbs rider |
| 1/4” | 7×7 | ~7,000 lbs | Backyard mid-range, up to 250 ft, adults under 250 lbs |
| 5/16” | 7×19 | ~9,800 lbs | Enthusiast spans, 250–500 ft, multi-adult use |
| 3/8” | 7×19 | ~14,400 lbs | Long-span / commercial-adjacent, heavy riders, dual-cable systems |
Breaking strength values based on published wire rope manufacturer specifications for domestic galvanized cable; actual values vary by manufacturer and should be confirmed against your supplier’s certified spec sheet before purchase.
Galvanized vs. Stainless Steel: The Tradeoff That Matters Long-Term
This is the question intermediate builders wrestle with most, and the honest answer is: it depends on your exposure environment and your time horizon.
Galvanized steel cable is zinc-coated to resist rust. It’s meaningfully less expensive — often 40–60% cheaper per foot than comparable stainless at mid-2026 pricing — and for a well-maintained backyard installation in a moderate climate, it performs well. The catch is maintenance cadence: galvanized cable develops surface rust at termination points and anywhere the zinc coating is abraded. Owners consistently report that inspecting and re-lubricating a galvanized cable annually is manageable, but skipping two or three seasons in a humid or coastal environment accelerates internal corrosion in ways you can’t see from the outside.
Stainless steel cable (typically 316 marine-grade for outdoor applications) resists corrosion far better, which is why camp directors, eco-resort operators, and builders in coastal or high-humidity regions consistently choose it for permanent installations. Spec sheets from suppliers like Zip Line Gear put the breaking strengths of comparable-diameter stainless cable roughly on par with galvanized, so you’re not giving up load capacity — you’re paying a durability premium that, over a 10–15 year lifespan, can be the smarter cost-per-year investment.
For a backyard span in a dry inland climate where you’ll inspect and maintain annually, galvanized is a defensible choice at the intermediate DIY level. For any permanent installation, commercial-adjacent use, or coastal/humid environment, the SaferParks zipline incident data summary notes that cable and termination corrosion is a recurring contributing factor in equipment degradation events — stainless is the call.
Cable Terminations: The Spec That Kills Cheap Cable Runs
You can buy perfectly rated cable and still build a dangerous system if your end terminations — the hardware that attaches cable to anchor plates and tensioners — isn’t matched to the cable’s rated strength. The two dominant termination methods for DIY spans are cable clamps (U-bolt clamps or fist-grip clamps) and swaged (mechanically pressed) end fittings.
Cable clamp assemblies are field-installable with basic tools, which makes them popular for DIY builders. The critical detail: the number of clamps required, their torque spec, and the orientation (saddle always on the live/load-bearing side, never on the dead end — “never saddle a dead horse” is the industry mnemonic) determine whether you’re capturing the cable’s full rated strength or only a fraction of it. Published wire rope rigging guides from the Wire Rope Technical Board specify minimum clamp counts by diameter; on 3/8” cable, for example, that’s typically four clamps at a defined spacing to achieve the full rated efficiency.
Swaged fittings — where a thimble eye or threaded stud is mechanically pressed onto the cable end by a shop press — achieve higher efficiency (closer to the cable’s full rated breaking strength) and are the standard on any installation following ASTM F2959 or ACCT guidelines. They’re not field-installable without equipment, but suppliers like AnytimeZiplines and SkyHighZiplines offer cable cut-to-length with swaged ends as a service, which removes most of the complexity for builders who don’t have a press.
The Petzl technical documentation on connector and anchor load ratings makes a related point worth internalizing: the weakest link in any anchor chain defines the system’s true capacity, and that weak link is almost always at a termination point, not in the cable’s mid-span.
The Sag-Tension Relationship: Why Your Cable Spec Affects Clearance
This section belongs in a deeper standalone article on cable geometry (and we have one), but no cable selection guide is complete without flagging the loop: the tighter you tension your cable to reduce sag, the higher the cable tension — and the closer you’re pushing toward your safety factor limit.
Cable sag — the downward bow at the midpoint of a span under load — is a function of span length, cable weight, rider weight, and tension. On a 200-foot span, a cable tensioned to produce 12 inches of midpoint sag under load is under dramatically more tension than the same cable allowed to sag 36 inches. That tension is borne entirely by your cable and your terminations. The CPSC Handbook for Public Playground Safety doesn’t address ziplines in detail, but its framework for overhead equipment clearance underscores why “tighten it up so it looks right” is an unreliable installation heuristic — sag has to be calculated, not eyeballed.
The practical implication for cable selection: if your site geometry requires a flatter cable (less sag) to clear terrain, vegetation, or ground obstacles, you need to either specify heavier cable with a higher breaking strength, or accept that your safety factor margin is tighter than it looks. Builders who get this wrong typically discover it at tensioning time, when a 1/4” cable that seemed adequate on paper is already at 30–40% of its working load limit before a single rider touches it.
The Decision Framework: If X, Then Y
After working through the specs, most intermediate builders land in one of three buckets. Here’s the clean decision rule:
If your span is under 200 feet, riders are under 200 lbs, and you’re in a dry climate with annual maintenance commitment: 1/4” 7×7 galvanized with properly installed clamp terminations meets the 10:1 safety factor for typical residential use. Confirm breaking strength with your supplier’s certified spec sheet — don’t rely on packaging claims alone.
If your span is 200–400 feet, you have adult riders up to 250–300 lbs, or you’re building something intended to last 10+ years with minimal maintenance: Step up to 5/16” 7×19 stainless with swaged end fittings. The per-foot cost increase is real; the liability and replacement cost of getting it wrong is larger.
If your span exceeds 400 feet, you’re running multiple riders, operating commercially or semi-commercially, or building for a camp or adventure property: You are in ACCT/ASTM F2959 territory. 3/8” stainless with engineer-reviewed terminations and documented load calculations is the baseline, and engaging a certified challenge course inspector before opening to participants is not optional — it’s the standard the SaferParks data suggests dramatically reduces incident risk.
Cable is the one component on your zipline where the right answer is always to over-specify slightly and document your work. The spec sheet you keep on file is also the paper trail that protects you if something ever goes wrong. Order right, build once, ride confidently for years.